Hi everyone!
Today I’m going to be talking about the Mini Contour service that Sephora offers, plus introduce you to my new friend and Makeup Artist, Nelly.
As you can tell by my long hair in the pictures below, I had this service done about a month ago. I’m a VIB Rouge with Sephora & one of the perks is you can receive free Makeovers without having to make a minimum purchase. About a month ago, they were also promoting a free “Mini Makeover” specifically geared towards contouring. Before meeting Nelly, I had no interest in the Makeovers because of my experiences with other Sephora MUAs. Usually when I go to Sephora to try on make up, I don’t wear make up to the store. What’s the point? Why wear make up there, just to have to take it off? 9 times out of 10 this results in the Make Up Artists thinking I’m a high school kid, that I don’t know how to wear make up AT ALL, or that I don’t like wearing makeup. I’m by no means a professional, but I know how to apply my own make up & am always looking to learn & test new products or application techniques. I’ve found that because of these misconceptions when people put make up on me they tend to lean towards 2 extremes. One, they do a SUPER natural look, or two, they do something extreme to “shake things up”. When this happens I don’t feel like I’ve really learned anything because these generally are not looks I want to duplicate. Thankfully, this was not my experience with Nelly.
I went to Sephora at the Westfield Valley Fair Mall specifically to do the Mini Contour Lesson. I know above I said I wasn’t interested, but I specifically wanted to get some tips on Contouring & Highlighting. Plus, I knew I could report back to y’all about the experience and maybe save you some time if it wasn’t worth while. However, I had a wonderful experience with Nelly! If you’re able to make your way to Valley Fair Mall in Santa Clara/San Jose area to go see her – do it!
I appreciated that Nelly went out of her way to get to know me & my beauty routine. The Makeover is only supposed to take 15 minutes – but we definitely went over that.
– We talked about the makeup I wear & my skin type to determine what kind of contour/highlight products I should be using. I thought you used a cream based product to create the “war paint” look, blended everything, then set it with a bronzer/highlight powder. Nelly told me that on my oily skin that would be a quick way to see everything crease up and/or look cakey – my worst nightmare!
– We also talked about the brands of makeup I use to see if I liked their contour/highlight options. Mixing and matching brands is fun & fine, but I think it can be smarter to stick to the same brand of face products. Companies make their products with the idea that they all work best together, they want you to wear their entire line! This keeps the ingredients you put on your face consistent which is a good idea if, like me, you have very sensitive & acne prone skin. If you know a certain brand has face products that work for you, why introduce another brand that may use different ingredients and/or makes their product differently & risk having a bad reaction? Just my two cents & of course, I don’t always follow my own advice, haha!
– An important aspect of contouring Nelly taught me is warm vs cool tones. I knew about there was a difference, but never thought much about it. We tested a contour stick I recently received as a Sephora sample & was excited to start using, but unfortunately it was much too warm aka orange! This is how she explained it, you’re trying to create the look of shadows/depth/dimension on your face. Shadows will have more of a grey/cool look to them, not an orange/warm/tan look.
– I had a general idea of where to contour and highlight to slim my round face, but Nelly gave me some tricks that I found helpful. For example, two lines of highlight, hugging the contour on my cheeks, really make that chiseled cheekbone pop!
Here are some of the products Nelly & I discussed, it was a Smashbox kind of conversation 😀 Click on the links to purchase!
1. Sephora Collection Pro Angled Contour Brush #75 – Sold out as of this posting, but just add it to your Loves List or ask to be emailed when it’s in stock.
2. Smashbox Step by Step Contour Stick Trio
3. Smashbox Step-By-Step Contour Kit w/brush
4. Smashbox L.A. Lights Blendable Lip & Cheek Color in Hollywood & Highlight
5. Smashbox Photo Finish Primer Water
Below is the finished look! As I was not wearing make up Nelly was kind enough to apply a light Cover FX foundation before the contour/highlight lesson. To further complement my “no make up” look & attempt to stick to the timeline, she created a more natural contour/highlight & gave me tips on how to amp it up for a more dramatic look.
-
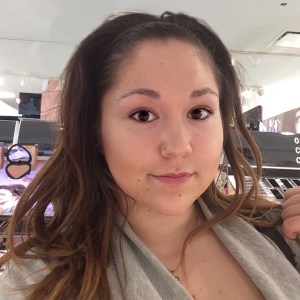
- Inside the Sephora: Valley Fair
-
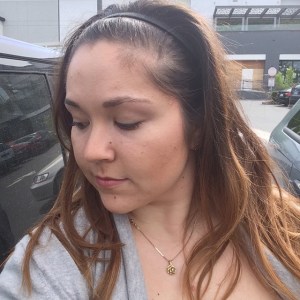
- Outside in natural light
So there you have it! This review might seem a bit contradictory because I talked about how I don’t like extremely natural looks, & then that’s what Nelly did. I just want to clarify that I’m fine with this because Nelly & I talked about SO many things beforehand & I understood we were on a time crunch. I would have been peeved if I’d gone in expecting to come out looking like Kim Kardashian did my contour/highlight, and got a natural look. That’s not the case here. I knew the look would be very soft and subtle. I’m happy with my experience with Nelly – I left her a great review on my Sephora survey! – & I will go back to her for the other full Makeover lesson that comes as a VIB perk.
Please follow her on Instagram: @itsnellydee & go see her at Sephora at the Westfield Valley Fair Mall!
Tag me (Instagram/Twitter: @missal_leigh) in your before & after pics so I can see the amazing work she does for y’all!
Thank you so much for reading, please click the FOLLOW button on the top right of this page to be updated when I write a new post – stay tuned for a Review of the full Sephora Makeover!